Wednesday, 30 October 2013

Easy Scary Mouth Halloween Tutorial 

This is not my original design but all photos and text are mine
Products Used
I use Snazaroo white face paint, Snazaroo black face paint, Red Snazaroo face paint(I got this one in a little set), and some brushes.


Start by creating little tooth shapes in a mouth shape.


Next create a slight mouth shape with the black paint, start filling in between the teeth then fill the rest of the space.

With the red paint create an over exaggerated smile. then fill .


If you want to add the eyes then just create rings around the eye and add triangles. Then add some blood.


Easy Wound Tutorial For Halloween 
Before Trying this out, make sure you are not allergic to any of the products. I can not be held responsible for any reactions.


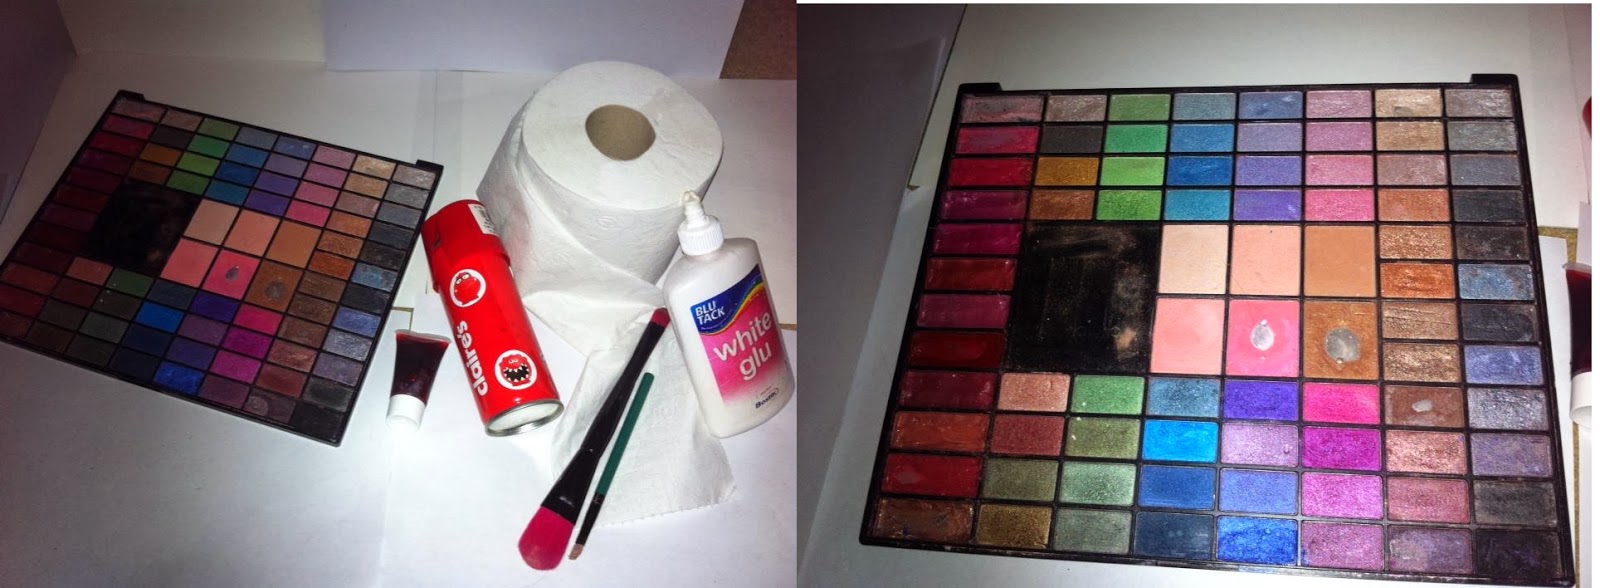
The products you will need:
Toilet paper,PVA child friendly glue (try a small bit on your hand before using it for the wound) Fake blood, two old makeup brushes, eye shadow (pink,purple,red,black) I also used a tiny bit of red spray but make sure you are not allergic.


Take a tiny bit of PVA and apply it to the place that your wound will be.

Rip up a small piece of toilet paper and stick it to your hand in a circle shape, then put one piece of toilet paper in the middle and keep that piece flat.
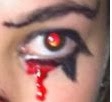
Wait for the paper and glue to dry before going onto the next steps.Apply some Black eye shadow around the paper and in the middle to create some depth.

Then add some purple shadow red and pink. When i do it I improvise as i go along. But just remember to create a bruised effect. Then add either some of the Red Spray or some fake blood. If you use the fake blood remember to put it on a brush and sweep it across the wound. Then clear the edges around the wound up but make sure there is still some black shadow  for definition. To finish it off add a blob of fake blood in the middle.

Monday, 5 August 2013

Maybelline Colour Tattoo 24 HR - On & On Bronze

Maybelline colour Tattoo 24 HR - On & On Bronze is an eye shadow with a mouse like consistency and perfect for the days when you don't want to spend ages on your eyes but want some colour. You can apply this product using either your finger or a brush which makes it even more helpful.The shade 'On and On Bronze' is a metallic bronze colour that when put on the eye just as it is,creates a simple but really pretty look. The 'colour Tattoo' colors all last long through out the day, and do not smudge.You can were this colour either as it is on the eye or do a smokey eye with it by adding brown eye shadow in the crease. either way this is a very wearable product for many occasions.

Purchased at Superdrug: http://www.superdrug.com/maybelline/maybelline-colour-tattoo-24-hr-on+on-bronze/invt/414464

Price paid: £4.99

Along Came Betty Mascara Longest Lash


Along Came Betty Mascara Longest Lash is another great product. I had not heard of this brand before so decided to give it a go, and I loved it. The brush (shown above) is very small and thin so therefor it grips onto every individual lash making each of the looking longer and fuller.It is also perfect for bottom lashes. This mascara gives a very natural look but paired with 'Rimmel Scandal'eyes Mascara' creates an even fuller and more dramatic effect.

The only down side on the this product is that it is not waterproof.

Purchased at Tesco's: http://www.tescomagazine.com/beauty/make-up-and-skincare/tried-and-tested-mascaras.html

Price Paid: £3.99

Rimmel Scandal'eyes Mascara


Rimmel Scandal'eyes Mascara is so good, It volumise's your lashes making your eyes look fuller.The brush (shown above) is quite big so it is great for grabbing the lashes and making them bigger, although due to the size of the wand it is difficult to use on the bottom lashes but you can always use a different product for the bottom. The downside of this product is that it is waterproof.

Overall I think this product is great especially when you wear it with 'Along came Betty's' mascara ( see other review)

Purchased from Boots:http://www.boots.com/en/Rimmel-Scandaleyes-Mascara_1238021/

Price paid: £6.99

Reviews

Sharing things I like

Sunday, 4 August 2013

Accessories

Talking about and showing you Accessories

Fashion

talking about Fashion

Home

the home page

Makeup

Talking and showing you different makeup looks

Hair

Talking and showing you different hairstyles

Summer Nail Design (Toes)


This is a really simple but effective way of making your toes look ready for summer!

To begin you will need some equipment (shown above): white nail polish, pink nail polish,Green nail polish (preferably nail art pens) nail file and small paint brush.


First of all you need to paint the nail with a white base,  I applied two coats so the colour becomes opaque, I used 'Angelica' in 'snow white' but you can use any type of white polish.  


Take some of the pink polish onto your small paintbrush, create one semi circle shape in the top right hand corner and one on the bottom left hand corner, I used 'kiss me quick' pink polish.

 Take your green polish, and using the pen side (shown above) draw two small lines on the top left hand corner and two on the bottom right hand corner, I used 'Rio Nail Art pens and brush'


The last step is to add white dotes into the center of the 'flowers' I would recommend finishing it off by adding a top coat so the design lasts longer.

This Design is not my own, but this is my recreation.